
Open-source AutoML tools are rapidly becoming dominant in the entrepreneurial landscape. These solutions help enterprises implement and scale their ML and AI projects.
AutoML open-source tools automate the entire life cycle of ideating, conceptualization, development, and deployment of predictive models. From data preparation through model training to validation as well as deployment, these tools do everything with almost zero human intervention.
Since most of these tools may seem to be similar, not one tool will suit all use cases. So, one challenge is evaluating several platforms and identifying the best fit for your project.
This decision should be based on various considerations, such as ease-of-use, competitive differentiations, risk tolerance, integration with existing tools, regulatory compliance, and more.
Below, we’re going to review the most popular open-source AutoML tools. With enough data at hand, choosing the right tool should become easier.
AutoGluon
In January 2020, Amazon entered into the ultra-competitive world of AutoML with the release of AutoGluon. With this easy-to-use, open-source toolkit, ML-based application developers can extend AutoML with an emphasis on deep learning and real-world applications spanning text, image, or tabular data.
Amazon’s AutoGluon lets developers build prototype deep learning solutions in reduced time, improve bespoke data pipelines and models, and enable automatic hyperparameter tuning.
Presently, AutoGluon creates models for object detection, image classification, supervised learning, text classification with tabular datasets.

source: Amazon
AutoGluon-Tabular’s approach to AutoML
Engineers have been applying statistical procedures to tabular data for decades, either to gather summary statistics or to build predictive models. Using the right approach, AutoML can help in areas such as sales forecasting, demand and supply prediction, fraud detection, and generating product recommendations based on user preferences.
With AutoGluon-Tabular, users can access the best practices employed by seasoned data scientists through a user-friendly API. AutoGluon-Tabular provides the following benefits:
- Robustness: Enables users to work with raw data without any data manipulation or feature engineering.
- Simplicity: Enables users to train and deploy classification and regression models with minimal coding.
- Fault-tolerance: Enables users to resume training after interruptions occur, inspecting all intermediate steps in the process.
- Predictable-timing: Helps users obtain the ideal model under a specified time constraint.
In summary, AutoGloun-Tabular saves time by automating time-consuming manual processes – handling missing data, data splitting, manual feature transformations, algorithm selection, model selection, and repeating the process as data changes.
Neural Architecture Search
One most important AutoML features in AutoGluon is called neural architecture search. These tools optimize the weights, structure, and hyperparameters of an ML model’s algorithmic “neurons” to ensure the accuracy, speed, and efficiency of neural nets in performing data-driven inferences. Neural Architecture Search allows AI developers to automate the optimization of models for high-performance inferencing on various hardware platforms.
AutoGluon automatically generates a high-performance ML model from Python code. It taps into available reinforcement learning (RL) algorithms and computes resources to search for the best-fit neural-network architecture for the target environment.
Ensembles and multi-layer stacking
With AutoGluon, you don’t need stacking and ensembling skills. AutoGluon-Tabular automatically does it for you by introducing a novel multi-layer stack ensemble.
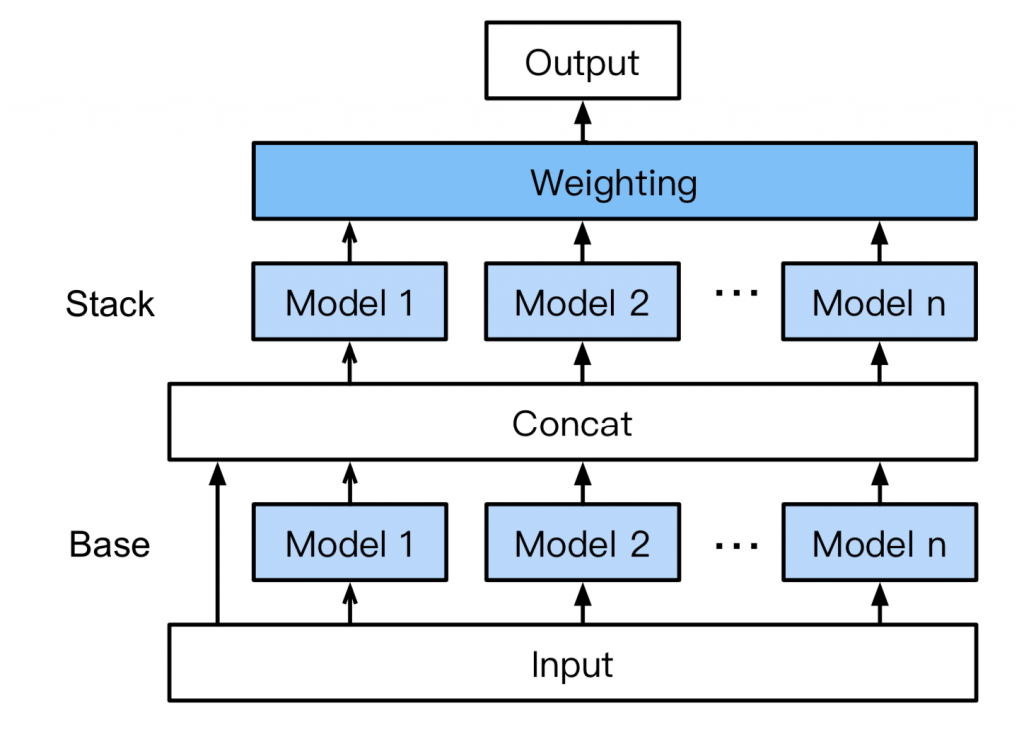
AutoGluon white paper
Here’s how this model works:
- Base layer: Trains individual base models, such as Random Forests, CatBoost boosted trees, LightGBM boosted trees, Extremely Randomized trees, etc.
- Concat layer: Base layer’s output is concatenated with the input features.
- Stacker layer: Trains multiple stacker models on the concat layer output. This layer re-uses the exact same models in the base layer. Stacker models can look at the input dataset because input features are concatenated with the output of the base layer.
- Weighting layer: Implements an ensemble selection approach in which stacker models are introduced into a new ensemble.
AutoGluon-Tabular performs k-fold cross-validation to ensure that every learner can see the entire dataset.
TransmogrifAI
Transmogrif AI is an end-to-end AutoML toolkit for structured data written in Scala and runs on Apache Spark.
It was developed to accelerate machine learning developer productivity through AutoML and uses an API to enforces compile-time type-modularity and safety. Through automation, Transmogrif AI achieves high accuracy with a 100x reduction in time.
Specifically, TransmogrifAI utilizes AutoML in five areas of an ML workflow:
- Feature Inference: Extracts features from a given dataset.
- Transmogrification: Converting features into numeric values.
- Feature Validation: Reducing dimensions and identifying potential bias, etc.
- Model Selection: Conducts searches across thousands of potential models.
- Hyperparameter Optimization: Hyperparameter configuration tuning
![]()
Source: Linkedin
Vectorizers and Transmogrification
This stage automates the feature engineering step in the ML pipeline. The TransmogrifAI transmogrifier (shortcut .transmogrify()) applies default transformation on a sequence of features based on feature types. Finally, it combines these transformed features into a single vector.
val features = Seq(email, phone, age, subject, zip code).transmogrify()
Feature engineering can be done at the single feature level in combination with automatic type-specific transformations. The .vectorize(….) method with each feature type transforms the feature into a feature vector with some input parameters.
NLP – NER Detection
Feature engineering uses this stage to detect NERs in a sentence. It includes the following steps:
- Token Generation:
NameEntityRecognizer is a class named as NameEntityType text recognizer. This recognizer helps encapsulate OpenNLPAnalyzer.
Once the text is tokenized, you have to initialize the NamedEntity Tagger.
- Extract Person Tags
Extract by passing following values to nerTagger instance defined above:
val personEntities = tokens.map { tokenInput => nerTagger.tag(tokenInput.value, Language.English, Seq(NameEntityType.Person)).tokenTags }
- Extract Date: Use the following code to extract Date from the tokenValue using NameEntityType.Date.
val dateEntities = tokens.map { tokenInput => nerTagger.tag(tokenInput.value, Language.English, Seq(NameEntityType.Date)).tokenTags }
- Extract Organization: Extract organization using NameEntityType.Organization.
Auto-sklearn
Auto-sklearn is an open-source AutoML tool implemented in python. Built around the scikit-learn library, Auto-sklearn contains a machine learning pipeline that takes care of categorical features, missing values, rescaling the data, and sparse and dense data.
The AutoML tool includes a total of 110 hyperparameters, 15 ML algorithms, and 14 preprocessing methods, arranged as shown in this figure:
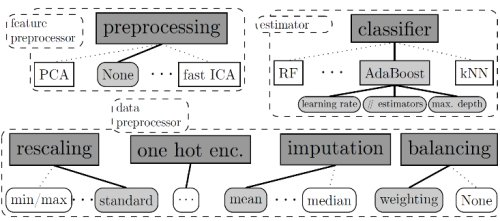
source: University of Freiburg
Auto-sklearn toolkit features a database of previous optimization runs on OpenML’s 140 diverse datasets. For every new dataset, this tool first identifies similar datasets and begins from the saved best settings. The second improvement to the tool is automatically constructed ensembles that make it construct ensembles from the models trained at the time of the Bayesian optimization.
Auto-sklearn Installation
Users can install Auto-sklearn via a simple pip command:
pip install auto-sklearn
If you are using Ubuntu, you will need a SWIG and C++11 building environment.
sudo apt-get install build-essential swig
To install via Anaconda:
conda install gxx_linux-64 gcc_linux-64 swig
Auto-Sklearn Implementation
Auto-Sklearn implementation requires uses to get a few imports:
Autosklearn.classification to load the classifier later
sklearn.model_selection for selecting model
sklearn.datasets for dataset loading
import sklearn.metrics for model performance measuring
Memory and Time Limits
One important feature of auto-sklearn is limiting memory and time resources that are used by the scikit-learn algorithms. This stops evaluations to make progress in a particular amount of time, especially for large datasets on which algorithms take several hours to make a machine swap.
The resource limit is a tradeoff between the number of models to be tested and optimization time. Auto-sklearn alleviates the need for manual hyperparameter tuning, though users still have to set memory and time limits.
A memory limit of 3-6GB is sufficient for most datasets. As for a good time limit of one day, 30 minutes for a single run are enough.
Parallel Computation
Auto-sklearn allows parallel execution via a shared file system. The SMAC algorithm in this model shares the training data by writing it to disk with every iteration. When the iteration begins, SMAC loads all new data points.
In the default mode, the AutoML toolkit uses two cores. The first core is used for building a model, while the second one is used for building an ensemble whenever a new machine learning model finishes training.
Moreover, based on the installation of numpy and scikit-learn, the model building process may use some of all cores. It is unintended by auto-sklearn and numpy installed from pypi as a binary wheel.
NNI
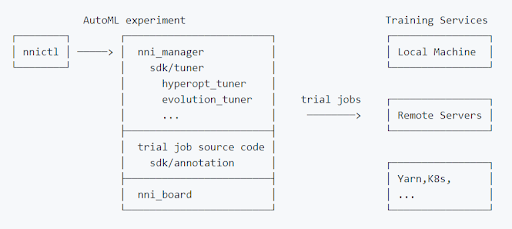
In 2017, Microsoft released an open-source AutoML toolkit on GitHub, called ‘Neural Network Intelligence (NNI)’. The toolkit helps users perform efficient neural architecture search and hyperparameter tuning.
Microsoft says, “the tool runs trial jobs generated by tuning algorithms to search for the best neutral architectures and hyper-parameters at local or remote servers, cloud, or other environments.
You can use NNI toolkit if you have to support AutomL in your existing ML infrastructure, or you want to implement and compare your own new AutoML algorithms with existing ones. NNI toolkit also works excellent when you try different versions of AutoML algorithms.
NNI provides users with the capacity to run multiple instances in parallel to find the best parameter combinations. This feature is useful in various ways, like finding the best database configuration, finding the best hyperparameters for deep learning models, etc. It also provides algorithm toolkits for deep learning and ML, especially neural architecture search (NAS) algorithms, feature engineering algorithms, and model compression algorithms.
NNI Experiment
An NNI experiment refers to the task of finding out a model’s best hyperparameters and finding out the best neural network architecture. The experiment involves trials and advanced AutoML algorithms.
In an experiment, the tuner generates configurations using the search space. These configurations are submitted to training platforms, including training clusters, a local machine, or remote machines. As the performances are reported to tuner, new configurations are generated for further processing.
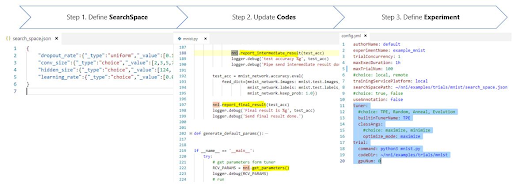
Each NNI experiment consists of three steps:
Step 1: Define Search Space: Tuner samples parameters or architecture according to the search space, which is defined as a JSON file.
Step 2: Update model codes: An NNI trial is an individual attempt at applying a configuration to a model.
Step 3: Define Experiment: Users need a config file when creating an NNI experiment. The file exists in YAML format and it is provided to nnictl.
source: NNI
General NAS Framework
This NAS framework allows users to quickly specify candidate neural architectures for a single layer. NNI toolkit finds the right candidate automatically. Contrarily, the NAS framework serves another type of user with a simple interface for implementing new NAS algorithms.
NNI supports many one-shot NAS algorithms including DARTS and ENAS through NNI trial SDK. You can use these algorithms without performing an NNI experiment. Simply, import an algorithm in your trial code and run it. You can tune the hyperparameters or run multiple instances by choosing a tuner and commence an NNI experiment.
You can also run NAS in a classic mode where each candidate architecture operates as an independent trial job. Users start an NNI experiment and then select a tuner for NAS.
Automatic Feature Engineering
Automatic feature engineering helps users to find the best features as per their needs. Since NNI trial SDK supports it, you do not have to create an NNI experiment for using this feature. You can directly import a built-in auto-feature-engineering algorithm in your trial code and run it.
These algorithms feature a bunch of hyperparameters that you can automatically tune leveraging hyperparameter tuning of NNI.
Model Compression
NNI model compression includes quantization algorithms and pruning algorithms. Provided through NNI trial SDK, these algorithms can be directly used in trial code without an NNI experiment.
Users get different types of hyperparameters, including the hyperparameters in input configuration to a compression algorithm. Here, NNI hyperparameter tuning helps in finding the best-compressed model automatically.
Summary
As discussed, these open-source AutoML tools work equally well. However, each has its own set of features and potential applications. Although this is not an in-depth analysis, it should help by providing highlights on the different tools.
The basic premise of AutoML is to automate repetitive manual tasks, such as hyperparameter tuning and creation of pipelines. It allows data scientists to spend more time on practical scenarios rather than running repetitive tasks manually all over again. The open-source AutoML tools allow data scientists to accelerate ML development by implementing efficient machine learning.
Whether the success of AutoML depends on its progress and usage in the machine learning field, it is a crucial part of machine learning in the future.