

When it comes to web server software, Nginx has quickly been closing the gap set by rival Apache with an estimated 21% of the top one million busiest websites on the Internet today using Nginx software. Nginx performs all the functions of a web server, proxy server, web accelerator and load balancer, giving developers the flexibility to build and deploy their sites with ease. In order to better understand the specifics behind these features, I will breakdown the details necessary to implement Nginx on your system and delve deeper into their functionality.
The Installation
To begin, Nginx recommends installation of their software on Linux based systems. While it is possible to run it on Windows, for the best performance they don’t recommend it. When beginning installation it is important to note that given its status as an open source project, Nginx has multiple versions running in parallel. The two versions available for download are the stable version and the mainline version. Nginx recommends using the stable version for most users, which contains all current updates to the code, but may lag when implementing new development features and getting the critical bug fixes ported into it. On the other hand, the mainline version is used by those actively developing the software, allowing it to receive the new features and bug fixes quicker, but consequently this may cause the software to be less stable.
There are two different ways to install Nginx. The first option is to download the source code directly from Nginx’s online repository and build Nginx on your own. If you decide to do this, note that Nginx requires three library dependences to properly install the default build configuration, as seen below:
- PCRE: for the HTTP rewrite module
- Zlib: for the HTTP Gzip module
- OpenSSL: for HTTPS protocol support
Nginx also publishes their own packages for installation on a wide variety of operating systems. Installing straight from the package is easier and faster, but these packages are often outdated and you won’t be able to install any 3rd party modules. They are, however, built with the same default modules as the source code.
Modules
Although Nginx differs greatly from the Apache module system, it does rely on its own modules that are built into the software, which can be enabled or disabled during build time. When building Nginx, you can specify which modules you want, but the downside is that if you don’t include a module in the beginning and later require it, you must rebuild Nginx from the source to apply it to your server. By default, though, many of the necessary modules are included at the start from their full list. Nginx also supports many third party modules that aren’t packaged with the main distribution that can be found here.
Basic Configuration
The way that Nginx works is specified in a configuration file called nginx.conf. The most basic Nginx configuration file that performs most tasks is shown below, containing the default values.
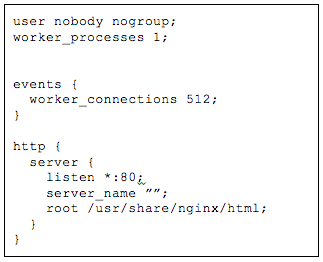
To get a feel for the configuration language, there are two directives. The most basic one is called a simple directive, which is a simple statement made up of a name, the parameters and a closing semicolon. The other is a context directive, which wraps the directive inside of curly braces instead of using a semicolon.
Breaking down the configuration above, we’ll start with the first two lines of code. Since they aren’t wrapped in a context directive, they are part of the main context. The top line defines the user and group that the worker processes will run as, and the bottom line defines the number of worker processes, which is usually the same your system’s CPU. Within Nginx, there are two main processes—the master and the worker. The master process reads and executes the configuration, binds the necessary ports and runs the worker processes, while the worker process is responsible for taking in all client HTTP requests. This is the core of how Nginx functions as an HTTP router.
The next section of the configuration file is the events context, which manages the number of worker connections. There is only one events context and it must be in the main context for the software to function properly. Each worker process is single threaded and runs a non-blocking event loop to process requests at a quicker rate. Running this event loop helps Nginx to combat any concurrency issues, allowing the same threads to handle multiple connections and requests in one work processor.
The next section is the HTTP context, where you define your HTTP servers and applicable directives. Below that is the listen directive, which tells the server what network interface and port to listen on, with defaults set to *:80. Then there is the server_name directive, which is used to determine what context to use for an incoming request. This is useful for virtual hosting, since it can be modified to allow multiple domain names on the same interface and port. The last line of the configuration is the root directive, which is responsible for specifying the path of the directory to serve the static files stored on the server.
Note that when you make a change or modify the Nginx configuration it does not pick it up automatically, so you have to reload the process for it to be implemented. Reloading Nginx starts new worker process and ends the old one, but does so without dropping any web requests.
Before running this configuration, you must also run the Nginx server, or whatever other web server you choose to use for your backend. If you used a package to install Nginx, then you can use the script service nginx start to initiate the server. If you installed it from the source, you can just run nginx to start the server. With this configuration entered in and the server running, Nginx will now begin serving up static files to the Internet.
Serving Static Files
Getting to the practical uses, Nginx at its foundation was designed as a faster means to serve static files. Nginx stores all its files in a common directory called a directory root, which is where all requests are diverted so the server can locate the desired material.
When serving these requests, Nginx employs something called a location block, which allows for more advanced mapping between the HTTP Request and the file system where that information is stored. Nginx does this by customizing each incoming request URIs, and matches them with a prefix, string or regular expression in the header. This allows for requests to be grouped and processed through different directories based on their customized prefixes, and then potentially served out of entirely different directories. Using these location blocks to sort requests can improve performance, especially for highly accessed URIs.
Serving Dynamic Content
While Nginx is great at serving static files, it requires supplementary programming to serve out any dynamic content. Developed in the 90’s, Common Gateway Interface (CGI) is a way for a web server to pass a client request to an application program, receive the dynamic content, and forward it to the user. This process is relatively simple—a CGI script is stored on a web server and when the request comes in, the servers return the output directly to the browser. Now, this model of CGI is not used nowadays, or even supported by Nginx, given the security issues and slow performance.
Instead, Nginx uses FastCGI, a direct replacement of CGI, which added a bit of complexity to the model in order to increase performance and address security. With CGI, the web server executes the scripts directly with no between layer. With FastCGI, though, the web server talks with a FastCGI server daemon program running on the computer as an intermediary. Configuring this FastCGI server on your system will then allow you to fetch dynamic material using your Nginx software.
Proxying and Load Balancing
One of the most useful elements of Nginx is its ability to perform HTTP proxying, passing off requests to the backend HTTP for processing. Most often, Nginx is used as a reverse proxy, similar to Varnish, to help scale out infrastructure and divert requests to other servers that can better handle large client loads.
Nginx also has built in load balancing capabilities to improve performance by diverting traffic to different servers. Load Balancing is also a form of reverse proxying, only with three fundamental differences.
- Load Balances work across many backens, while reverse proxies serves a single backen
- Load Balancers operate at either Layer 7 or Layer 4, while reverse proxies operate at the application layer
- Load Balancers focus on scaling the amount of traffic a server receives on a massive scale, while reverse proxies do not
Load Balancers are useful when handling failure, spreading the load horizontally across multiple backend. They also provide extra layers of redundancy across the system, which is useful in case a server ever fails. In terms of stability, Nginx has the ability to handle many concurrent connections, which makes it ideal for being the point-of-contact for clients so then Nginx can distribute the request out to other backend servers, spreading the load across the infrastructure.
Caching with Nginx
One of the main reasons Nginx supports such faster speeds is its ability to cache content for quicker retrieval. There are two directives needed to enable basic caching: proxy_cache_path and proxy_cache. The first directive sets the path and configuration while the second directive activates it. Below is the basic configuration, which I’ll walk you through in the bullet points.
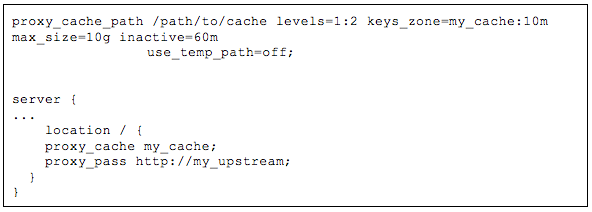
- proxy_cache_path: the directive that defines the following settings
- /path/to/cache: the local disk directory for cache storage
- levels: sets up a two-level directory to better handle large numbers of files. If the parameters for the levels are not set, Nginx puts all files in the same directory.
- keys_zone: sets up a shared memory for storing the cache keys and metadata. Having a copy of the keys helps Nginx to determine if a request is a hit or miss without having to go to the disk, which speeds up the search.
- max_size: sets the upper limit for the size of the cache. Not setting a value allows the cache to grow until all disk space is used. When the limit is reached the cache manager will remove the oldest files to create space.
- inactive: specifies how long an item can remain in the cache without being accessed. The default value is set at ten minutes, then inactive content will be expired and deleted from the cache directory.
- use_temp_path=off: Nginx first saves cached items in a temporary storage. They recommend disabling this to avoid unnecessary copying of data between file systems.
- proxy_cache: this directive activates caching of all content that matches the URL or the location block. This can also be be applied in a server block.
While this configuration is the basis of caching in Nginx, there are also several tuning features that allow you to modify the caching software to fit your specific needs. With further modification you can perform features such as, setting the number of times an item must be requested by clients before it is cached, setting the system to deliver stale content when an update is being downloaded from the origin server, setting it to house expired cached material that has not been modified in the origin server in order to save on bandwidth, and so on. Cache can also be split up and saved across multiple hard drives with a simple split client configuration to set that up.
Some other things to know about caching, by default Nginx obeys cache-control headers defined by the origin server. You can change the header to ignore these defaults or set new parameters for the content being cached. Also, even though a program like FastCGI is needed to retrieve dynamic content, provided the cache-control header allows it, dynamic material may be cached in the directory as well.
That sums up some of the basics when it comes to installing and configuring Nginx. Whether you’re still deciding between Nginx or other software like Apache TS or Varnish, hopefully this information will help you to make an informed decision that best suites your sites’ needs.