
Since its inception in 2001, HAproxy has grown to become one of the most widely used open source load balancers on the market. It was designed specifically as a high availability load balancer and proxy server for TCP and HTTP-based applications, operating in both layer 4 and layer 7. Due to its speed and scalability, its became widely used by very high traffic websites, including GitHub, Reddit, Tumblr, Twitter, parts of Google, and so on.
Over the course of this guide, we’ll give you a break down its basic architecture and configuration, and also draw a comparative analysis, matching it up against other industry load balancing software to help you better choose what’s best for your platform.
Understanding Load Balancing
Load Balancing, otherwise known as fault-tolerant proxying, helps to disseminate requests going into one domain across multiple web servers, where they access the stored data requested by clients. The main objective of load balancing is to avoid having a single point of failure so that no part of the machine is important enough that if it fails the system will crash.
HAproxy was built to alleviate these concerns as a fast, reliable and free load balancer proxy for TCP and HTTP based applications. It is written in C programming language with a single-process, event-driven mode that was designed to reduce the cost of context switch and memory usage. Other systems that use pre-forked or threaded servers use more memory, but HAproxy can process several hundreds of tasks in as fast as a millisecond.
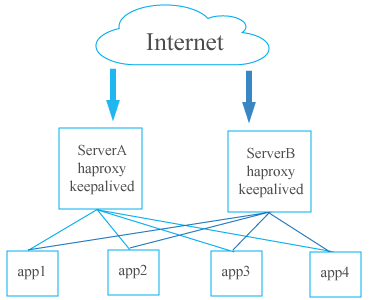
The basic architecture we’ll be discussing is as seen above. While the diagram shows five backend servers, HAproxy could be connected to hundreds of them, with multiple load balancers handling the requests. What’s important to note is that the load balancers have a connection to each other, which is called peering. This is integral to running your system smoothly and we’ll discuss that specific configuration more in depth later on.
Configuration
After installing HAproxy from their online repository, you will need to perform some basic configuration changes. The configuration file is located in /etc/haproxy/haproxy.cfg. After opening it, you will find two major sections—the global section and the proxy section.
Global Section
Under the global section, you have several options as seen below.
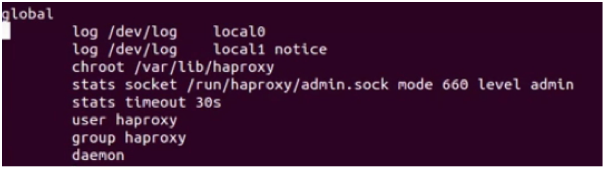
The first thing you will see is the log file, which decides where the logs will be saved. This particular configuration has the logs saved to the local hardware, but they can also be directed to any remote machine that has been properly enabled. Below that you will be able to decide your socket and your user groups. If you have user groups with different permissions, you can apply all those changes here. Lastly you have the deamon setting, which ensures that HAproxy is run on the background as a service.
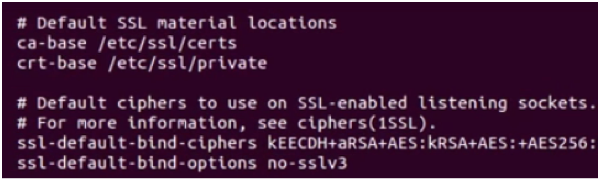
The next part specifies that HAproxy natively supports SSL, which means that if you have encrypted channels, you can set the public key for the clients and the private key for the servers.
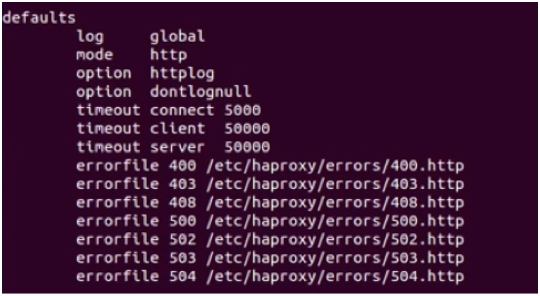
Next you have the default configurations. The first configuration defines what will be logged. By default it is set to global, which means it will log everything. Below that, the mode is set to HTTP, but based on your needs you can adjust this to use TCP, which we’ll discuss in the next section.
Under the options configuration you have several different settings to choose from that define what the system will log. Below that, the code defines all the timeout procedures, which are set to 50 seconds. So if a request is made and not satisfied within that set time frame, the connection will be dropped. The following errorfile lines are where the log files will be saved, the 400’s for the client and the 500’s for the server.
Modes—TCP vs. HTTP
What makes HAproxy so efficient as a load balancer is its ability to perform Layer 4 load balancing. In TCP mode, all user traffic will be forwarded based on IP range and port. The user accesses the load balancer, which will forward the request to the backend servers. The backend server that is selected will then respond directly to the user, which streamlines the process.
The other form of load balancing is Layer 7, or HTTP load balancing, which forwards the requests to different backend servers based on the content of the user’s request. This mode is more commonly used when running multiple application servers under the same domain and port, because it searches the content of the package in order to sort the request. While HTTP mode is good for sorting, TCP mode is ideal for speed since it doesn’t have to open the package to sort the requests. Unlike a lot of other load balancers, HAproxy is unique because it has both options built in.
Proxies Section
The next section of the configuration code is the proxies section, where you can configure your frontend and backend servers.
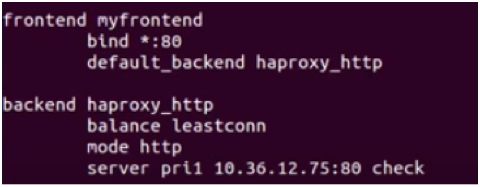
Under this section you will see the frontend and backend codes. The frontend defines how requests should be forwarded to the backends to fetch the information. For the frontend, you must simply define it with a name and bind it with a port.
This then leads down to the backend, where the requests will end up. A backend is defined by a load balancing algorithm and the list of servers with their respective ports. There is also a “check” option at the end of each server line, which will allow HAproxy to perform a check on each server before satisfying the request to make sure the backend is up and running.
Load Balancing Algorithms
Load balancing algorithms are used to determine which backend server will be selected when load balancing. There are three main kinds supported by HAproxy listed below.
-Round Robin- sends the request in turn, one for each back end server
-Source- directs request based on source IP address
-Least Connection-request will be sent to server with least amount of connections
Based on the needs of your site, you can adjust these accordingly so the traffic patterns to each server are balanced accordingly .
Peering
A key aspect to making this architecture work is peering up multiple load balancers. This makes it so that multiple load balancers speak to each other, which means they can parse out the information in tandem and not duplicate requests. Also as a failsafe, if one of the load balancers crashes, then the other one will step-in and continue serving information for the site. In order to configure this, you first need to make sure you have version 1.5 of HAproxy or higher.
Right now, in the configuration file there are four main sections, and below those you can add a fifth named “peers.”
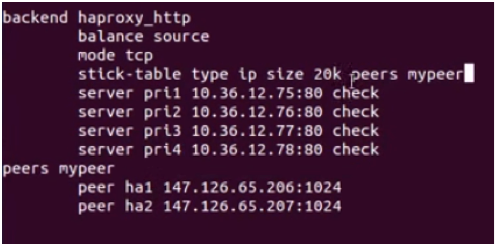
You must define the name and enter in each load balancer IP address as well as the port. For the port, it can be any one except 80, the one you used for the proxies, because then it will conflict.
After that you need to make sure to dedicate the memory. Since each node keeps the status of the other, dedicating the memory makes sure that they are aware of each other’s functionality. In order to do this, you need to create a table in the memory. You do this by going to the backend section and defining the stick-table, IP address, size of the memory, and the name. You then do this same configuration for the other load balancer and now they will work in concert to disseminate the requests. What’s great about this is fault tolerance, which means that if one fails there is built in backup with the other one.
Nginx vs HAproxy
When deciding what load balancer to use, there are two main options on the market today—Nginx and HAproxy. Below is a quick chart outlining some point-by-point feature comparisons.
|
Nginx
|
HAproxy |
| -Full Web Server | -Only Load Balancer |
| -Complicated, Slower | -Faster |
| -Works with Windows | -Only Open Source |
| -No Admin Console | -Admin Console |
| -Only HTTP Layer 7 | -TCP (Layer 4) HTTP (Layer 7) |
| -Good Caching | -Advanced Routing and Load Balancing |
| -Native SSL | -Native SSL |
Now, deciding on one or the other is contingent on your systems needs. For example, if you want a load balancer and web server to be located on the same software, go for Nginx. However, if you want to do Layer 4 load balancing, you would need to go with HAproxy. In many side-by-side analytical tests, the results have shown that HAproxy is marginally faster since it solely functions as a dedicated load balancer, while Nginx is better for caching. From an operations standpoint, it may be easier to use Nginx since it is all packaged together, but with all the extra capabilities it has, it is more complex to configure than HAproxy.
So while there’s no definitive winner in the showdown between Nginx and HAproxy, the both put up a good fight. Now it’s up to you to decide what is best for your load balancing needs.